Carry that weight
We continue to fit out our long-term H-D Street Bob
Bob the bike’s been with us now for a few months and with each new H-D part fitted is fast becoming a really nice and individual bike to ride. And not just as a commuter, either, but also for those longer trips away. In Part 2 Bob gets a few extra bits fitted, one practical and one that can only be described as an excellent accessory that I think should be fitted from the start. Anyway, we also explore the range of H-D luggage and what’s available for Bob there.
Not everyone uses their cruiser for daily commuting, but if you are one of these riders who brave the elements then you should have good gear, and not just for yourself but for the bike as well. This is where you need to have good solid luggage, right?
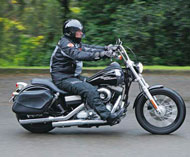
But luggage should not only look good; it also has to suite the bike, be dust- and water-proof and it has to hold a fair amount of gear. After a lot of researching the H-D bible we opted for a pair of synthetic leather saddlebags. They have a streamlined shape to them that suited the bike’s style. The ones we chose had two press studs on each end of the front and back flaps, plus hook and loop (Velcro) sides to keep the whole cover firmly in place. The bags measure 22 inches long by 12 inches high and eight inches deep and are extremely sturdy, with a solid inner rigid plastic tub that will keep the bags in shape for years to come. The bags are located by two bolts which mount through the bag and through each side rail of the bike inside the inner-rear mudguard. Inner mounting plates are included, but you will need to purchase the turn signal relocation kit which shifts the indicators further back past the bags and further apart.
The next accessory we had fitted is the most amazing thing I’ve seen in a long time, and one of the best. Remember the days when fuel gauges only existed in cars and you had to rely on your trip metre on your speedo, and you had to have a reserve tap? Well, things have changed of course and now most bikes don’t come with reserve taps. You have to rely on a fuel gauge instead. On most bikes these are located in an easy place to find, and they’re easily readable. Unfortunately in Bob’s case this was not really so. The petrol tank gauges on H-Ds are not as easy to read as you may think; they are badly lit, they are also at an angle and fairly small so it makes them even harder to see and read. But this is where the trusty H-D bible comes back in; in the Parts Catalogue they have this absolutely terrific Flush Mount Tank kit.
The kit is comprised of one push-in and turn filler cap which has a seven-level LED fuel gauge incorporated in it. Each LED is a very bright blue and as the fuel gets used, the LEDs shut down. Now it doesn’t matter what weather conditions you are riding in, your gauge is super visible and readable. Just look for the glowing blue lights on the tank. I reckon every bike should have one of these!
There are times when you may need to carry a pillion, but Bob didn’t have any rear pegs to cater for them so we decided to fit a set just in case I got lucky.
Now, just to remind you: if you are mechanically minded and your intention is to work on your own bike, then it’s a good idea to make sure you have the right tools. And if you’re not sure about some procedure, get some advice. It could save you a lot of stress and money.
Project Bob continues in Cruiser+Trike #4, so catch up with us then!
